How to Unbrick the Redmi AX6000

A router can be bricked by flashing the wrong firmware, damaging the bootloader, or interrupting a flash.
Bootloader damage is the hardest case because it requires hardware intervention. A wrong firmware image may be recoverable depending on which bootloader is installed.
Case 1: Bricked by incorrect firmware
With the stock bootloader
Use MiWiFiRepair Tools to return to the manufacturer’s stock ROM, then reinstall the desired firmware.
With OpenWrt U-Boot Mod
When the system breaks, OpenWrt may enter recovery automatically. Set up a TFTP server so recovery can load the initramfs image, then reinstall firmware.
Prepare openwrt-mediatek-filogic-xiaomi_redmi-router-ax6000-ubootmod-initramfs-recovery.itb from the OpenWrt downloads.
Configure a TFTP server
- Download the latest Tftpd64 (for example, Tftpd64-4.64 for 64-bit Windows).
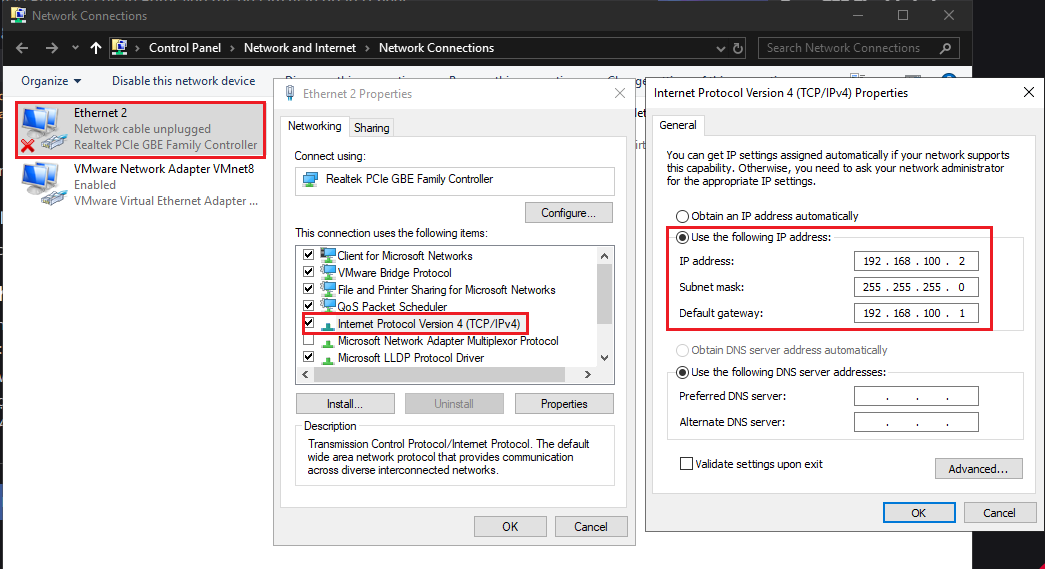
- In Windows, open the Ethernet adapter’s IPv4 properties and set:
- IP address: 192.168.1.254
- Subnet mask: 255.255.255.0
- Default gateway: Leave empty.
📂 Screenshot ▼
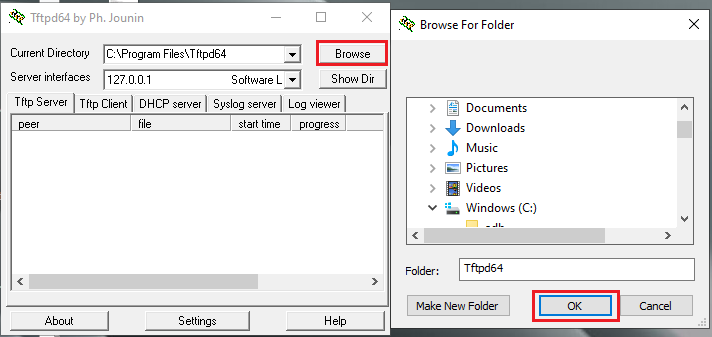
- Open Tftpd64, click Browse, and select the directory containing the recovery file.
📂 Screenshot ▼
If the TFTP server is correct, wait a few minutes for OpenWrt to load the file and boot. Then reinstall firmware using the OpenWrt installation guide.
Older U-Boot Mod versions may have TFTP issues and fail to load OpenWrt recovery. If so, use the NAND-programmer procedure below.
Case 2: Bricked by a failed U-Boot installation
Connect the NAND pins correctly. A wrong connection can destroy the NAND; probing directly on the board can also damage the CPU.
Requirements:
- Hardware rework and soldering skills.
- The ability to operate a terminal and use command-line tools.
- This is an advanced procedure; no beginner-level walkthrough is provided here.
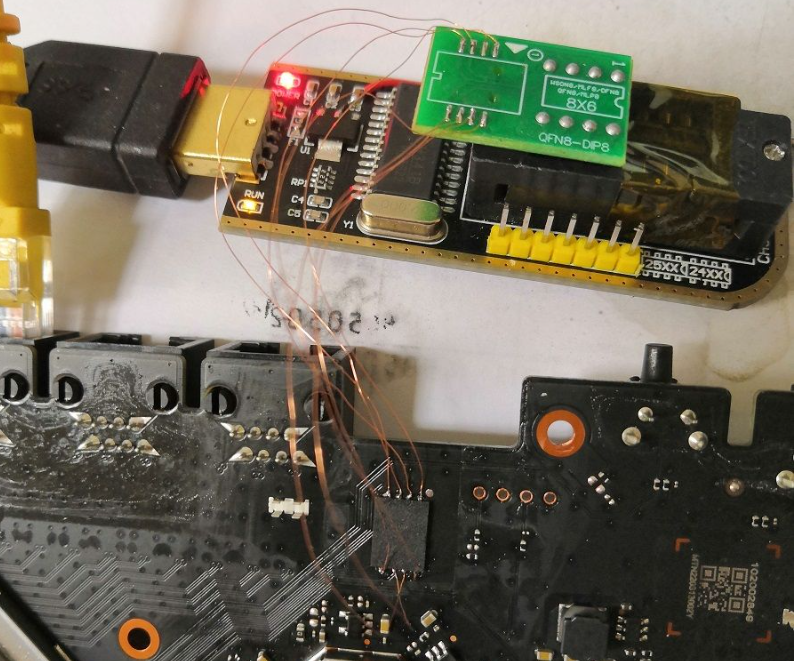
At this point the router is effectively a brick. Use a NAND programmer such as CH341A/B, xGecu T48/T56, or MiniPro. The budget option for non-specialists is the CH341A/B.
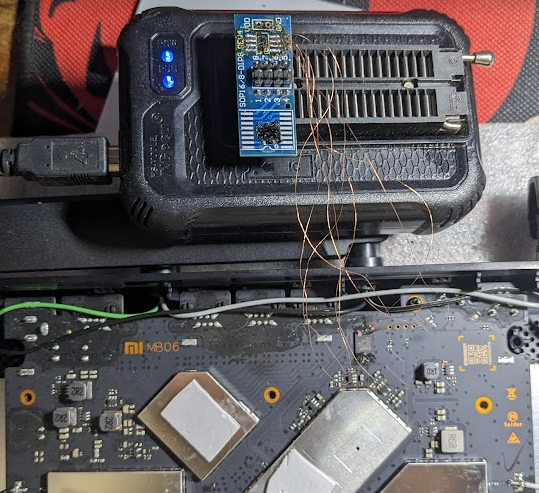
The Redmi AX6000 uses an ESMT F50L1G41LB 128MB, 3.3V SPI-NAND.
Download one of the two NAND dump files shared in the OpenWrt forum. This guide uses the 132MB file.
Connect the NAND to the programmer by soldering directly or removing the chip.
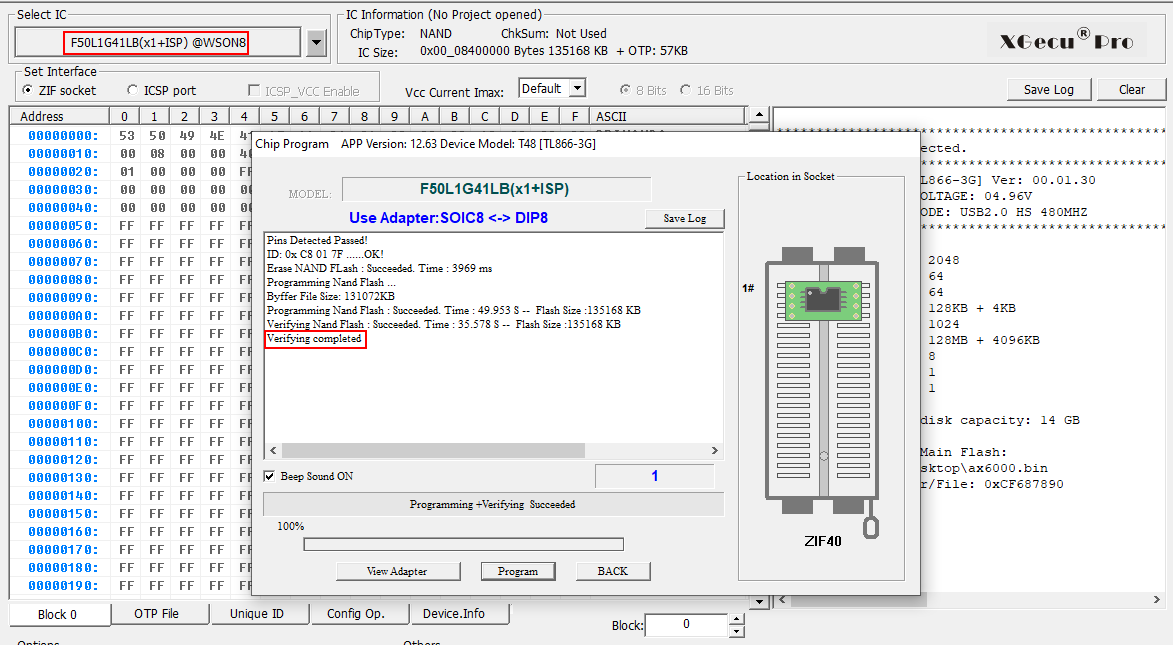
With XGecu (T48/T51), disable ECC, load the dump, and start programming.
With CH341A/B, install SNANDer and use the command line:
SNANDer -d -eSNANDer -d -w F50L1G41LB(ECC_DIS)@WSON8-AX6000-RB06.bin# Change the filename as requiredProgramming takes under one minute with a T48 (under two minutes including verification), and about 15–20 minutes with a CH341A/B.
If boot stops with:
...FA: 1040 0000 [0200]F9: 3905 0036F3: 1001 0000 [0200]F3: 1001 0000F6: 102C 000001: 102A 000102: 1005 0000BP: 2000 00C0 [0001]EC: 0000 0000 [1000]T0: 0000 00BE [010F]System halt!The NAND programming failed, the procedure was incorrect, or the file is damaged. Repeat the process after checking every connection and file.
If the UART log stops at INFO: SPSR = 0x3c9, the router has booted. To monitor UART during recovery, use a USB-to-TTL adapter such as this FT232. Connect only GND, RX, and TX; do not connect VCC until the voltage is confirmed.
Good luck. Leave questions and suggestions in the comments.
Comments & Discussion
Share your thoughts, ask questions and feedback