How to Install AdGuard Home Directly on OpenWrt

- I. Preparation
- I.1 DNS latency and performance
- I.2 Storage requirements
- I.3 Query logs and statistics
- II. Install AdGuard Home
- III. Configure AdGuard Home and dnsmasq
- III.1 Configure through SSH
- III.2 Configure the AdGuard Home web interface
- IV. Advanced configuration
- IV.1 Reverse DNS
- IV.2 Keep local domains away from upstream DNS
- IV.3 Redirect hard-coded DNS clients
- IV.4 DNS cache and Optimistic caching
I. Preparation
Routers with low RAM or storage, or a slow CPU, may not be suitable for running AdGuard Home. This is a general guide for OpenWrt devices. If you run into resource or performance problems, remove AdGuard Home or move it to a stronger device such as a Raspberry Pi or mini PC.
- At least 50 MB of free RAM.
- At least 100 MB of free storage.
- Preferably a higher-performance CPU, such as a dual-core processor with a higher clock speed.
Required RAM also depends on the filter lists you enable. Routers with less than 128 MB of RAM or only a single CPU core tend to perform poorly.
Another option is a Raspberry Pi Zero connected to the router’s USB port and used to run AdGuard Home. See the OpenWrt forum guide.
I.1 DNS latency and performance
For the best DNS performance and lowest query latency, configure AdGuard Home as the primary DNS server. If dnsmasq or unbound is already installed, move that service to another port and let AdGuard Home use port 53. Keep dnsmasq or unbound for internal reverse-DNS (PTR) lookups.
When AdGuard Home is only an upstream DNS server behind dnsmasq, all client requests may appear to come from the router’s single IP address. This increases the path length and prevents AdGuard Home from identifying individual clients correctly.
This guide moves dnsmasq to port 54 and uses it for local reverse-DNS lookups.
I.2 Storage requirements
Since AdGuard Home 0.107.0, the compiled binary is considerably larger. Statistics and query logs also consume storage. On routers with limited storage, use USB or another external path, or configure extroot.
A complete installation under /opt required about 100 MB in the reference setup:
- About 70 MB for the main binary and the upgrade backup.
- About 20 MB for filter lists.
- About 2 MB for 90 days of statistics.
- About 53 MB for seven days of query logs.
To save storage:
- Store query logs in RAM only when losing them at reboot is acceptable.
- Reduce the DNS cache size.
- Disable automatic updates and use UPX only if you understand the trade-offs.
- Keep only the two or three filter lists you actually need.
I.3 Query logs and statistics
Detailed query data is useful, but keeping it for a long time can fill a router’s storage. If the default tmpfs (RAM) is used, choose a shorter retention period or disable logging. For longer retention, move the working directory to external storage.
II. Install AdGuard Home
Since OpenWrt 21.02, the official AdGuard Home package can be installed with opkg. On OpenWrt 19.07, the package may need to be copied to the router and installed manually because it is not present in the application list.
Install over SSH:
opkg updateopkg install adguardhomeThe official package uses these paths:
- Application:
/usr/bin/AdGuardHome. - Main configuration:
/etc/adguardhome.yaml. - Working directory:
/var/adguardhome. - Service configuration:
/etc/config/adguardhome. - Init script:
/etc/init.d/adguardhome.
Because /var normally points to /tmp (RAM), logs and statistics in the default working directory disappear after reboot. To keep them, move the working directory to /opt or /mnt on external storage.
Enable and start the service:
service adguardhome enableservice adguardhome startIII. Configure AdGuard Home and dnsmasq
III.1 Configure through SSH
The following commands move dnsmasq to port 54, use it for reverse DNS, and advertise AdGuard Home as the LAN DNS server. Adjust the addresses to match your router.
Log in over SSH and run:
# Get the router's current IPv4 and IPv6 addresses. NET_ADDR=$(/sbin/ip -o -4 addr list br-lan | awk 'NR==1{ split($4, ip_addr, "/"); print ip_addr[1] }') NET_ADDR6=$(/sbin/ip -o -6 addr list br-lan scope global | awk 'NR==1{ split($4, ip_addr, "/"); print ip_addr[1] }') echo "Router IPv4 : ""${NET_ADDR}" echo "Router IPv6 : ""${NET_ADDR6}" # Keep dnsmasq for PTR requests and reduce its cache. uci set dhcp.@dnsmasq[0].noresolv="0" uci set dhcp.@dnsmasq[0].cachesize="1000" uci set dhcp.@dnsmasq[0].rebind_protection='0' uci set dhcp.@dnsmasq[0].port="54" uci -q delete dhcp.@dnsmasq[0].server uci add_list dhcp.@dnsmasq[0].server="${NET_ADDR}" # Remove old DNS options before adding the new values. uci -q delete dhcp.lan.dhcp_option uci -q delete dhcp.lan.dns # DHCP option 6: DNS server for name resolution. uci add_list dhcp.lan.dhcp_option='6,'"${NET_ADDR}" # DHCP option 3: default gateway. uci add_list dhcp.lan.dhcp_option='3,'"${NET_ADDR}" # Advertise IPv6 DNS addresses. for OUTPUT in $(ip -o -6 addr list br-lan scope global | awk '{ split($4, ip_addr, "/"); print ip_addr[1] }');do;echo "Adding $OUTPUT to IPV6 DNS" && uci add_list dhcp.lan.dns=$OUTPUT;done uci commit dhcp # Restart dnsmasq to apply the configuration. /etc/init.d/dnsmasq restartIII.2 Configure the AdGuard Home web interface
By default, the initial setup is available on TCP port 3000.
- Open
http://192.168.1.1:3000/, replacing the IP if necessary. - Follow the setup wizard and choose the Web Admin port.
- Keep the DNS port at 53.
- Set the administrator username and password.
AdGuard Home is now ready for basic use.
IV. Advanced configuration
IV.1 Reverse DNS
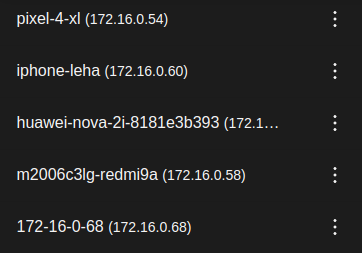
Reverse DNS allows AdGuard Home to display client hostnames such as pnghia-pc.lan.
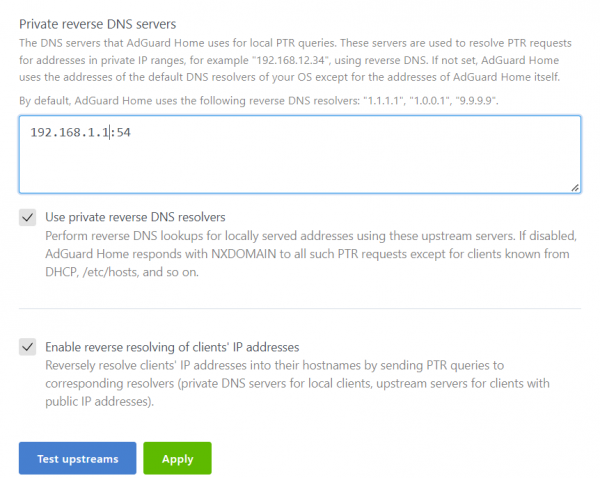
- In the AdGuard Home admin interface, open Settings → DNS settings.
- Find Private reverse DNS servers.
- Add
192.168.1.1:54, changing the address to match your router. - Enable Use private reverse DNS resolvers and Enable reverse resolving of client’s IP addresses, then click Apply.
IV.2 Keep local domains away from upstream DNS
To resolve local domains through dnsmasq instead of sending them upstream, open Settings → DNS settings → Upstream servers and add:
[/lan/]127.0.0.1:54[//]127.0.0.1:54Replace lan if your local domain is different.
IV.3 Redirect hard-coded DNS clients
Some devices bypass DHCP DNS by using a hard-coded server. The firewall can redirect their DNS requests to local AdGuard Home.
IV.3.1 OpenWrt with iptables/firewall3
Add these rules under Network → Firewall → Custom Rules, or put them in /etc/firewall.user:
iptables -t nat -A PREROUTING -i br-lan -p tcp --dport 53 -j DNAT --to 192.168.1.1:53 iptables -t nat -A PREROUTING -i br-lan -p udp --dport 53 -j DNAT --to 192.168.1.1:53Alternatively, add this redirect to /etc/config/firewall:
config redirect 'adguardhome_dns_53' option src 'lan' option proto 'tcp udp' option src_dport '53' option target 'DNAT' option name 'AdGuard Home' option dest 'lan' option dest_port '53'IV.3.2 OpenWrt with nftables/firewall4
Log in over SSH and run:
nft add rule nat pre udp dport 53 ip saddr 192.168.1.0/24 dnat 192.168.1.1:53IV.4 DNS cache and Optimistic caching
Optimistic caching lets AdGuard Home answer from cache while it refreshes an expired entry in the background. This can improve response time for domains that are accessed frequently, but stale data may be returned temporarily.
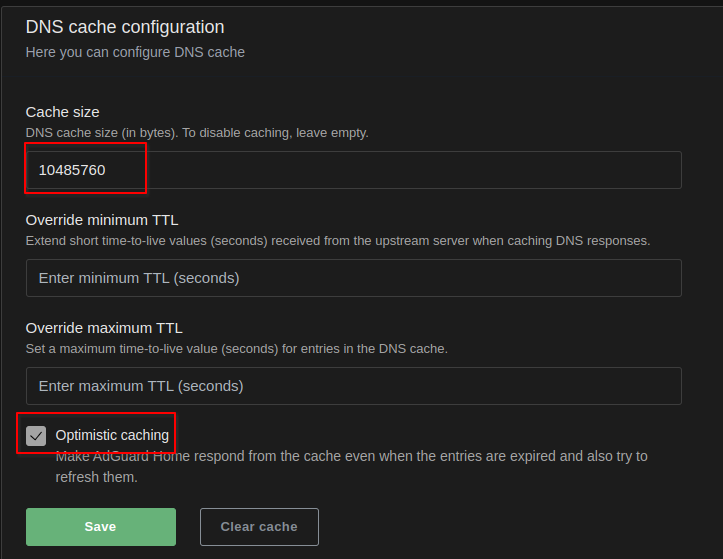
In the admin interface, open Settings → DNS settings → DNS cache configuration:
- Increase the cache size according to the router’s available memory.
- Enable
Optimistic cachingand click Save.
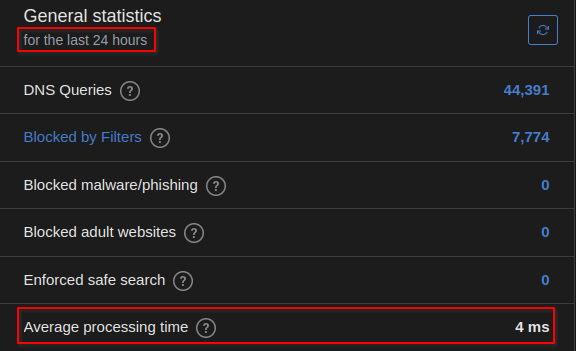
After enabling it, allow time for AdGuard Home to build its cache and observe the average processing time.
This article combines the OpenWrt AdGuard Home guide with practical configuration experience.
Good luck!
Comments & Discussion
Share your thoughts, ask questions and feedback